Posture, positioning, and trailbehavior
This article is part of a riding technique series, which is intended to give participants in our riding technique courses a summary of relevant content to read. Of course, there is sure to be one or two good tips for everyone else as well.
If you ask yourself the question: “How does mountain biking work?” the answer seems clear quickly. But if you delve deeper into the subject, a number of factors play an important role. Not only the correct suspension setup, but above all the correct riding technique is an essential component. The goals of riding technique are not only more safety on the bike, but also lead to better performance due to more economical movements, as well as more style in your own riding style.
Riding behavior
When we talk about riding behavior, we mean the basic position on the bike. This behavior is the essential starting point for mountain biking and an interplay of positioning and posture. Starting position means central, active and ready to move. From this starting position, you have to be able to react to all occurrences on the trail. Just as a tennis player stands in the middle of the court and returns to the middle as quickly as possible after each stroke in order to be able to accept the next ball, mountain bikers must also start movements from their riding behavior and quickly return to it.
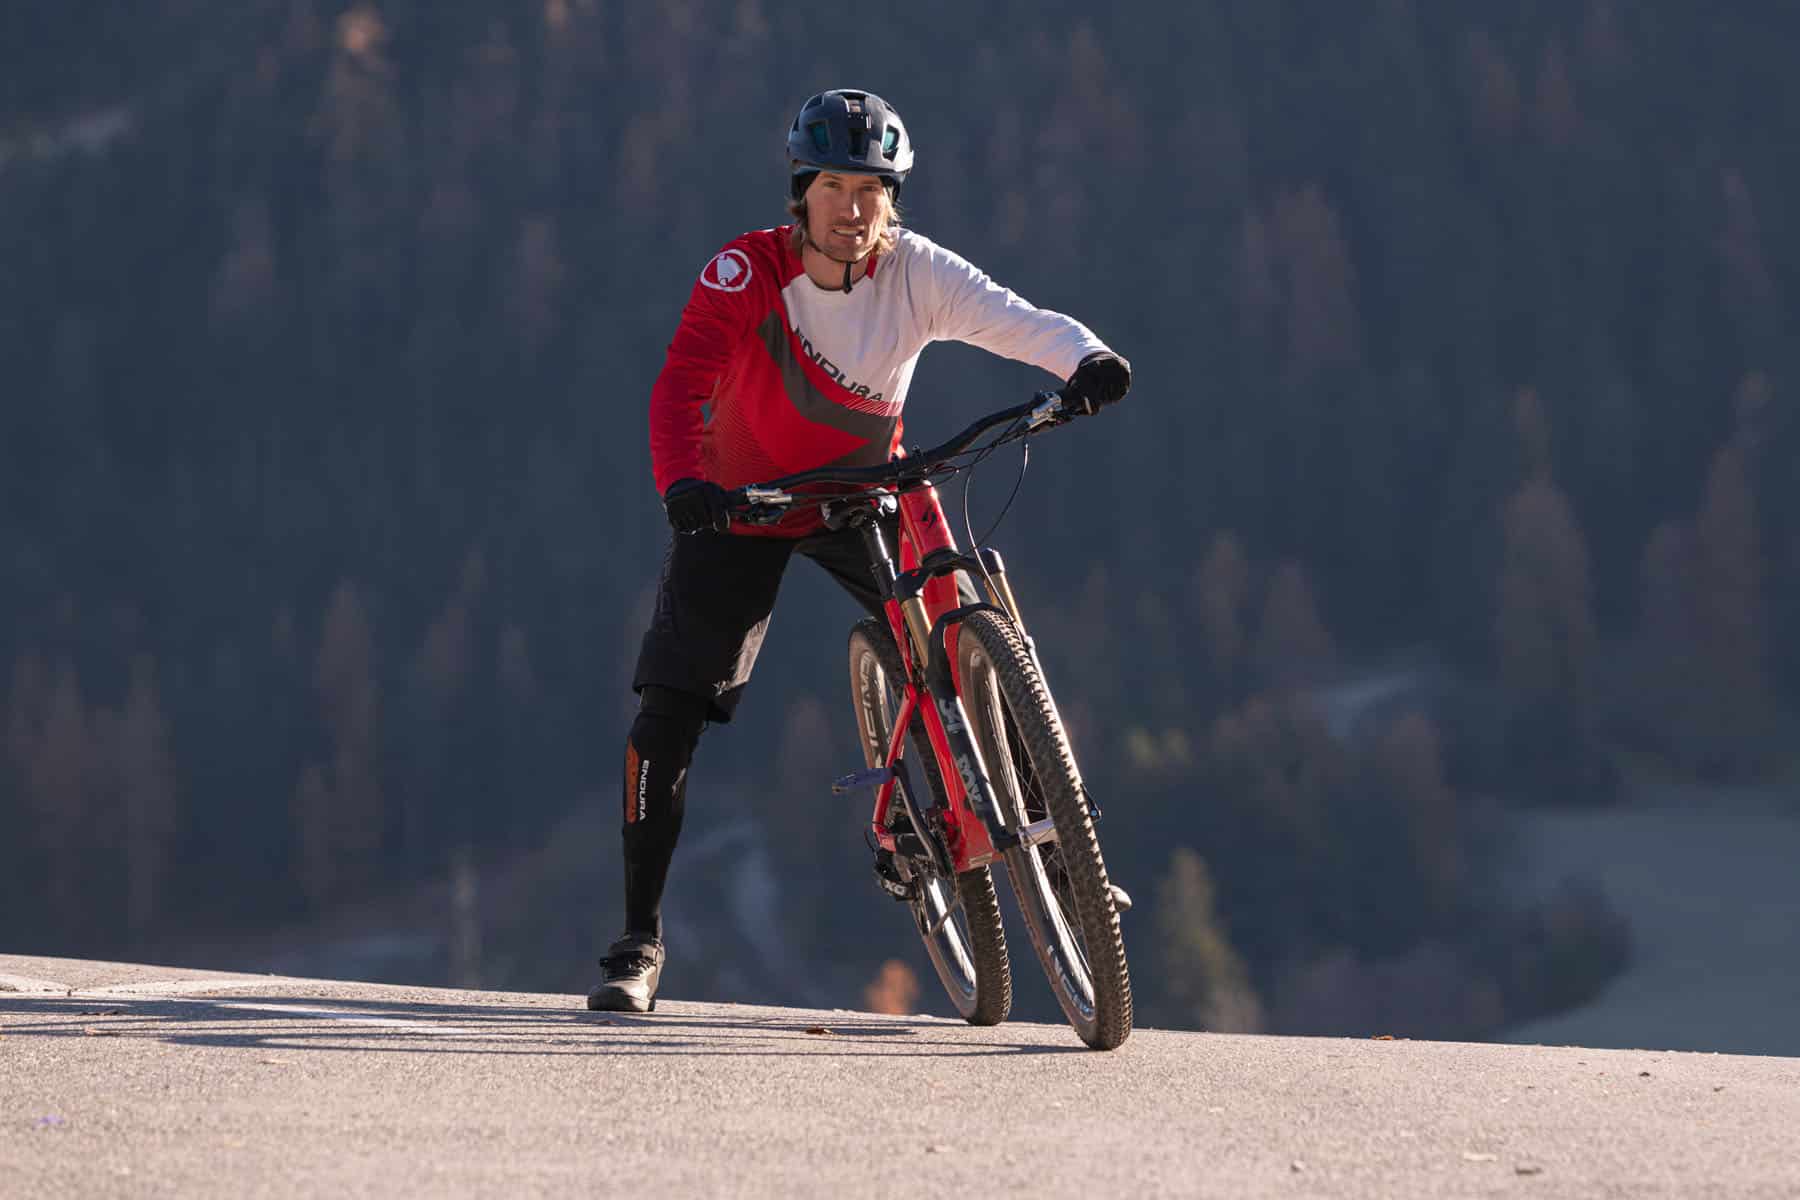
To better imagine the posture, we work metaphorically with the image of a gorilla. When riding, it is especially important that the crank is horizontal. This prevents the pedal from getting caught on an obstacle such as a stone or root, and the weight is evenly distributed on both legs. The ankle joint is neutral and the heels do not hang down, we are ready to move in both directions. The legs are almost straight and only the knee joint is slightly bent. The bend cushions impacts and offers more readiness to move. Stretching the legs saves a lot of energy and allows a lot of travel for cushioning. As far as positioning is concerned, the center of gravity remains central, which is best felt by applying slight pressure to the handlebars. This is achieved by having a high hip and a bent upper body. The hip is angled over the hip joint. The spine remains neutral. Above all, make sure that you do not make a hollow back.
If you position yourself too far back on the bike, the front wheel no longer has any pressure and can slip away. However, a pull can be felt on the hands. If your center of gravity is too far back, there is a risk that you will no longer be able to counteract the forces and it is possible to dismount over the bike to the front. The pressure on the hands is far too high. In order to have the greatest possible readiness to move, the elbows must also be bent sharply. It is important that the tips of the elbows are not pointing backwards, but tend to be pointing outwards. The rule is always high at the back (legs stretched) and low at the front (arms bent). As already indicated, the best indicator for the correct position of the center of gravity is the hands. We can feel exactly where the center of gravity is via the pressure on the handlebars when riding without braking. If the hands are unloaded, i.e. neither pressure nor pull, the center of gravity is exactly above the bottom bracket.
The hands are always firmly on the handlebars and the index fingers are on the brake lever, ready to brake. The view is far ahead and is adapted to your own riding speed. We look where we want to go, approximately where we want to be in 2 seconds. If you see your front wheel, you are doing something wrong! The view also supports cornering and can be described as a steering view.


trail behavior
With the term trail behavior, dynamics now come into play. In contrast to riding behavior, trail behavior adapts optimally to the terrain. For example, the center of gravity changes when the terrain becomes steeply downhill and tends to move further back. The pressure on the handlebars should remain the same as long as there are no braking influences. Trail behavior is the starting and ending position of advanced riding techniques and is an important element of trail skills. Trail behavior is generally adopted permanently when riding downhill and serves as a starting point for curves, steps or jumps. From this position you can and must react optimally to obstacles. In addition to the fork and shock absorber, actively working with your arms and legs is also particularly important. This allows impacts to be cushioned particularly well and leads to controlled downhill riding. Common mistakes in riding and trail behavior are stretched arms, sharply angled legs, axial misalignment of the legs (X legs) or incorrect hip positioning.
Typical mistakes


Special case: riding uphill
Especially on cross-country routes, you will always be surprised by steep climbs in the terrain. Here, in addition to the correct gear selection and speed, it is important to adopt the crouching position. The saddle is high, but you sit further forward and pull your elbows down to prevent the front wheel from rising. The upper body also shifts further down towards the handlebars. However, there should still be room for further steepening of the terrain. The view is always far ahead and you choose the best line for you. In addition, the rear brake can also be used for stabilization.


Braking technique
The mountain bike usually has a front brake on the left and a rear brake on the right. Generally, only the index finger is used for braking, a maximum of the index and middle fingers. The remaining fingers and hand hold the handlebars firmly. The braking process is initiated from the riding or trail behavior. You have to pay particular attention to your center of gravity. The same applies again: if you position yourself too far back, you have too little pressure on the handlebars and there is a risk that the front wheel will slip away. If the center of gravity is too far forward, there is a risk of overturning. It is extremely important that the center of gravity remains where it should be even when braking. Due to the deceleration of the bike under us and the inertia of the mass of our body, it always wants to move forward. We have to counteract this impulse with body tension.
When braking, the index finger is on the brake lever, the arms and legs are slightly more stretched and the heels are slightly lowered. This allows the body tension to be better maintained and the forces can be optimally counteracted. The braking technique should be practiced on different inclines and surfaces such as asphalt, gravel or grass. It also makes sense to practice with the two brakes individually. The more slippery the surface, the better feedback you get about the positioning of your own center of gravity. If the front wheel slips, you are too far back.
Since no trail is the same and no riding style is identical, the optimal use of the front and rear brakes has to be found individually. In general, the front brake is significantly more effective than the rear brake when you want to slow down, but it also requires more finesse, body tension, and practice to use it optimally.
Before corners, the speed should be reduced so that you do not have to brake in the corner if possible. If this is still necessary, the rear brake is the much better choice here, as the front wheel should steer as unbraked as possible in corners. In general, it is important to gain as much experience as possible when braking. How does a wet root affect you? How does braking in gravel feel? How do I react in particularly steep terrain? These are important insights into fine motor skills that you will gain over time on the bike.